Navigating large codebases can feel like exploring a maze. I have a long rant about how one of the best skills you can learn is how to drop into a large codebase and quickly get your bearings. Visual Studio Code offers a range of tools to help you zip around files and symbols—quickly tracking down definitions, references, and more. Let’s take a closer look at these essential navigation features.
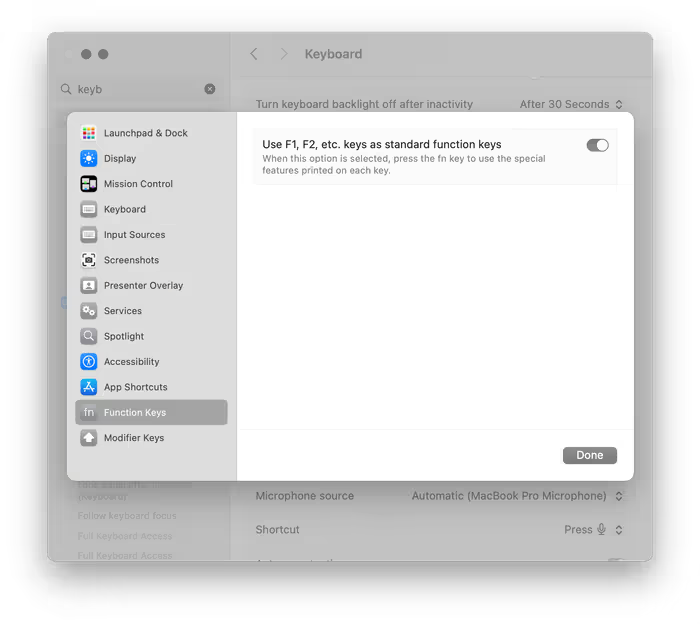
An Aside: A Free Trick for macOS Users
Visual Studio Code makes a lot of use of the function keys. The problem is—so does macOS. You could hold down the fn key on your keyboard. Alternatively, you can switch it so that your functions keys are F1, F2, etc. and only change your screen brightness when you press the fn key. This is one of the first things that I do when I set up a new Mac.
Go to Definition, Declaration, Implementation, and Type Definition
Pressing F12 to go to a symbol’s definition is a well-known Visual Studio Code trick, but it doesn’t stop there. For many languages, especially TypeScript and other popular languages, you can also jump to a symbol’s declaration, implementation, or type definition. Right-click a function, class, or variable name to see commands like Go to Definition, Go to Declaration, Go to Type Definition, or Go to Implementation. This lets you quickly investigate where a piece of code originates or how it’s structured, without manually hunting through files.
Find All References
Sometimes, you want to see every nook and cranny where a particular function, method, or variable is used. By pressing Shift+F12 (or selecting Find All References from the right-click menu), Visual Studio Code collates a list of every location in your codebase referencing the selected symbol. This is extremely handy when refactoring or analyzing the impact of changes before you break something by accident.
Peek Definition
If you love context switching as much as you love your dentist visits—which is to say, not at all—try Alt+F12 (Option+F12 on macOS). This opens a small inline window showing the symbol’s definition without leaving your current file. It’s perfect for quick checks: you can confirm a function’s parameters or a class’s properties, then close the peek view to continue coding uninterrupted.
Breadcrumbs
Breadcrumbs appear at the top of your editor and show the nesting structure of your code. They let you navigate through symbols like classes, functions, and methods within the current file. If you’re working on a hefty TypeScript file, simply click a breadcrumb element to jump straight to that part of your code. You can enable or disable them in Settings by looking up breadcrumbs.enabled.
View -> Appearance -> Show Breadcrumbs or search for breadcrumbs in the Command Palette. They’re a quiet but powerful way to move around complex files.
Outline View
The Outline view (accessible from the Explorer sidebar or via View -> Outline) offers a structured outline of all symbols in the current file—functions, classes, constants, and more. This is especially useful when you have a monstrous file or want a quick overview of everything defined. Clicking a symbol in the Outline jumps straight to its location in the editor. It’s like a table of contents for your code, minus the dog-eared pages.
Go to Symbol
In-file symbol navigation is speedy with Ctrl+Shift+O (Cmd+Shift+O on macOS). Start typing the symbol’s name, and Visual Studio Code will filter the list in real-time. Select the symbol you want, press Enter, and land exactly where you need to be.
For a broader, workspace-wide search, press Ctrl+T (or Cmd+T). This scours every file in your workspace for a matching symbol, which is particularly helpful in large projects. Quickly jump into that function declared 42 files away—no rummaging through folder structures needed.
Minimap Navigation
For a bird’s-eye view of your code, take advantage of the minimap. This feature displays a miniature version of your file along the right side of the editor, allowing you to quickly scroll and click to navigate to specific sections. You can fine-tune its behavior in your settings by adjusting properties such as editor.minimap.enabled, editor.minimap.renderCharacters, and editor.minimap.maxColumn:
{
  "editor.minimap.enabled": true,
  "editor.minimap.renderCharacters": false,
  "editor.minimap.maxColumn": 120
}Code Folding
When working with large files, code folding can be a lifesaver. It allows you to collapse functions, classes, or custom-defined regions so that you can focus on the code that matters most at any given moment. The folding icons in the gutter provide an intuitive way to hide or reveal code blocks, and you can use keyboard shortcuts—such as Ctrl+Shift+[ and Ctrl+Shift+] on Windows/Linux or Cmd+Option+[ and Cmd+Option+] on macOS—to quickly fold or unfold sections.
Quick Open: Fast File Navigation
Quick Open is a powerful tool for navigating between files in a large codebase. Press Ctrl+P (or Cmd+P on macOS) to open the Quick Open panel, and start typing the file name you need. Visual Studio Code uses fuzzy matching to instantly narrow down your options, letting you switch files without ever leaving the keyboard.
@ or jump to specific lines by adding a colon and the line number, making it a versatile tool for rapid navigation throughout your project.